
You press play on a recording you expected to publish and hear the room before you hear the speaker. The HVAC rumbles under every sentence, keys strike beside the microphone, and a dog barks just as the guest reveals the useful part of the interview. A musician hears computer-fan hiss across an otherwise promising vocal take. A video editor discovers that traffic noise followed an entire sidewalk sequence into the client's footage.
The first reaction is usually the wrong one. You consider re-recording, dragging an EQ notch across the spectrum, or turning the noise reduction control all the way up. Sometimes that works. More often, it trades a distracting recording for a hollow, metallic voice that still sounds unfinished.
Most recordings like these are salvageable, but the workflow has to match the noise and the job. A steady fan, electrical hum, reverberant room, passing conversation, and mixed music bed each require a different treatment. The practical question isn't just how to remove background noise online. It's whether you need a fast voice cleanup, a careful dialogue restoration, or true stem isolation.
Table of Contents
- The Moment You Realize the Recording Is Ruined
- Quick Mode Versus Pro Mode for Online Noise Removal
- A Step-by-Step Workflow That Holds Up in the Real World
- The Settings That Actually Change How Your Audio Sounds
- Matching the Workflow to Your Role and Your Audio
- Why Over-Cleaning Breaks Audio Faster Than Noise Does
- A 10-Minute Quick Start and Where Online Cleanup Is Headed Next
The Moment You Realize the Recording Is Ruined
A podcaster can spend an afternoon recording a 45-minute interview and hear the problem only during the edit. The guest sounds clear in the opening, but the HVAC becomes obvious whenever the guest pauses. Keyboard clatter cuts through the host's questions, and a dog bark lands directly under an important answer. The creator marks the take as unusable, then starts calculating the cost of arranging another interview.
A corporate editor faces a different version of the same problem. Client footage from a sidewalk shoot looks excellent, but the microphone captured traffic hum, wind movement, and nearby voices. The editor can cut around some of it, yet every jump in the room tone makes the sequence feel assembled rather than continuous. A bedroom musician may have no visual problem at all, but fan hiss and computer noise sit behind every sung vowel.
Why the recording may still be recoverable
Noise is not one solid layer that can be removed with a universal filter. It occupies a frequency range, changes over time, and sometimes overlaps the voice. A low electrical hum needs a different approach from broadband hiss. Room echo needs reflection control, while a second speaker may require separation before denoising.
Speech clarity can fall quickly as background sound approaches the voice. In one public-space intelligibility study, mean performance stayed above 90% correct below 60 dBA, then fell to roughly 80% correct as ambient noise rose from 60 dBA to 85 dBA. The study also found that effective signal-to-noise ratio dropped by about 0.44 dB for every 1 dB increase in noise above 60 dBA. These findings are reported in the peer-reviewed speech intelligibility study.
Practical rule: Preserve the words first. A little room tone is usually less damaging than missing consonants or a voice that sounds processed.
The same research reported speech intelligibility falling from 94.13% in quiet to 89.42% at SNR +5 dB and 61.95% at SNR +0 dB. That helps explain why a recording can feel acceptable during a quick check but become exhausting in a long interview, lecture, or call. For interview-focused workflows, a resource on AI cleanup for interviews can help you think about speech restoration as more than just lowering the noise floor.
Quick Mode Versus Pro Mode for Online Noise Removal
A creator cleaning a spoken memo usually needs intelligible words, not a studio restoration session. Quick mode makes that trade-off explicit. An online model identifies patterns that resemble noise, suppresses them, and returns a finished file with little setup. It suits a steady fan, air conditioner, light hiss, or consistent room tone under mostly isolated speech.
The failure appears when the background changes. Broad suppression can soften consonants, make breaths pump, or cause room ambience to shift unnaturally between phrases. It can also damage music. Cymbals, reverb tails, and vocal overtones may resemble the material the model is removing. For a meeting recording, that may make one speaker easier to hear while making the overall conversation less natural.
Pro mode breaks the job into deliberate treatments. Depending on the service, it can learn a noise profile, target hum and hiss separately, reduce reflections, and isolate dialogue, vocals, music, or other sources before final cleanup. That separation helps when traffic, music, and another speaker share the track. Each source gets a more specific treatment instead of forcing one filter to classify every sound at once.
A two-stage research pipeline demonstrates why suppression and restoration can be separated. Its LSTM suppression stage produced more than 5 dB of SNR gain versus baselines, while a restoration stage raised PESQ by about 0.1 MOS points on unseen, highly non-stationary noise, including interfering speech. The speech-restoration evaluation also found that higher SNR does not automatically produce better perceived quality. Use the number as context, not as permission to push reduction until the voice sounds synthetic.
| Stage | Quick Mode | Pro Mode |
|---|---|---|
| Analysis | Fast speech and noise detection | Detailed source and noise analysis |
| Reduction | One broad suppression pass | Separate hum, hiss, echo, and source treatments |
| Best fit | Straight voice with steady background noise | Dynamic noise, music beds, reverb, or mixed dialogue |
| Main risk | Smearing speech when pushed | More processing time and more settings to manage |
| Output control | Usually one finished file | Optional isolated stems and targeted exports |
Device limits also affect the choice. Comparative speech-enhancement research reported strong U-Net improvements across noisy datasets, including +71.96% on SpEAR, +64.83% on VPQAD, and +364.2% on the Clarkson dataset. It also reported lightweight suppressors reducing computational complexity and memory by 3–4× compared with earlier state-of-the-art methods. The comparative speech-enhancement research supports a practical split: use fast processing for interactive work, then choose heavier modes when the file must withstand publication and closer listening.
A Step-by-Step Workflow That Holds Up in the Real World
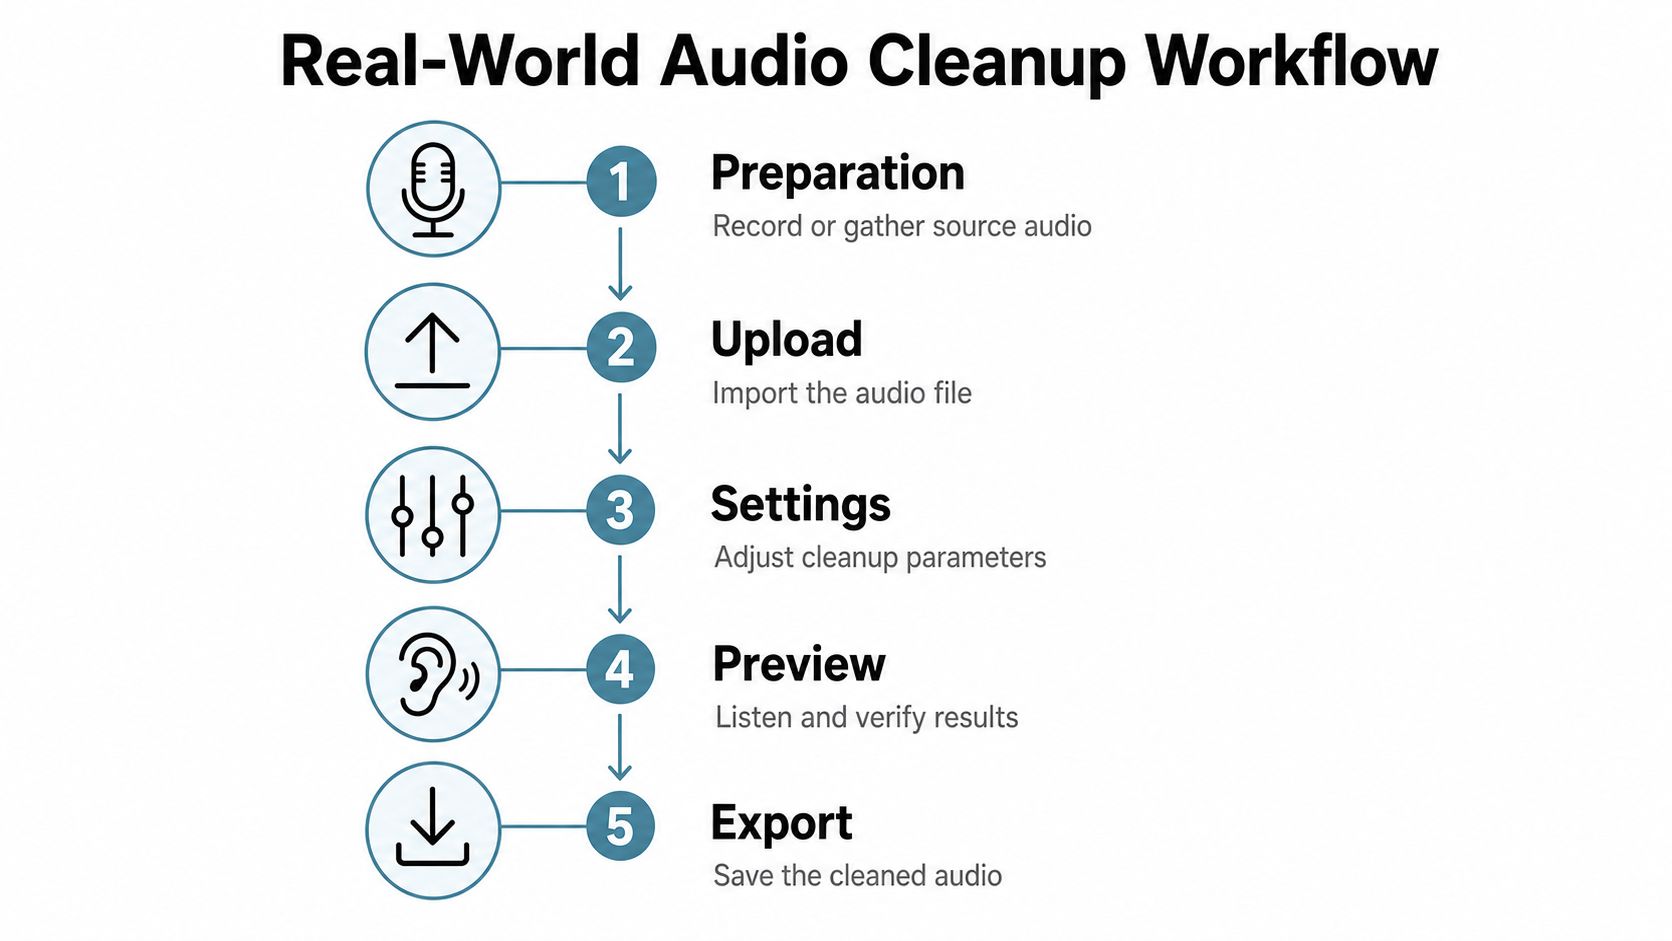
A usable cleanup workflow begins before upload. A creator reviewing a noisy interview should first remove empty sections, handling bumps, and obvious dead air. With less irrelevant material to inspect, the online cleaner can focus on the voice and the noise competing with it.
Prepare the source
Start with the cleanest file available. WAV gives serious post-production more room to work, while a 48 kHz, 24-bit source preserves useful editing headroom. If MP3 is the only option, upload the highest-quality copy, not one repeatedly exported through messaging apps. A heavily compressed 128 kbps file may already contain swishes and missing high-frequency detail that denoising cannot restore naturally.
Upload and build the profile
Choose processing for the job, not for how loud the noise seems. Quick mode fits a spoken memo or a clean interview with a steady fan. Pro mode is better suited to a reverberant room, changing traffic, overlapping speech, music, or video that requires dialogue isolation. One-click cleanup often misses noise that changes under the speaker's words, while heavier processing gives you more control at the cost of time and more opportunities to over-process.
If the tool learns a noise profile, supply the loudest useful section of background sound without speech. A short passage containing HVAC or hiss gives the analyzer a clearer target than a long section where the guest talks over the noise.
Preview before committing
Run a short preview. Check it on headphones first, then speakers. Headphones expose metallic ringing, reduced sibilance, and unnatural breath movement. Speakers show whether the voice still fits its room or has become narrow and brittle.
Increase processing gradually. Changes of 2–3 dB increments are easier to evaluate than one aggressive pass. Stop when the unwanted sound becomes unobtrusive. If the voice sounds cleaner but less credible, reverse the last increase. A technically quieter track can still fail the job if listeners notice the processing before they understand the speaker.
Export without adding another problem
Export at the original or a higher bit depth when the file will return to an editor. Avoid repeated lossy encoding, especially before normalization, compression, and music mixing. Once dialogue is intelligible, creators can use a dedicated tool to clean up spoken content easily, keeping filler-word removal separate from noise reduction instead of asking one processor to solve unrelated problems.
Use the short demonstration below to compare untreated and processed speech before committing to the full file.
The Settings That Actually Change How Your Audio Sounds
Noise reduction amount is the broadest control, but it isn't the first setting to push. It determines how much of the material identified as non-speech gets attenuated. Increase it until the HVAC, hiss, or traffic becomes unobtrusive, then stop before consonants lose their edge.
Hum removal works differently. Electrical interference often has a fundamental frequency and harmonics, so a tool may offer a 50 or 60 Hz target with additional harmonic filtering. Use it for a tonal buzz or mains hum, not as a general-purpose control. If you hear the voice becoming thin, the notch may be reaching into the lower body of the recording.
Hiss reduction handles the broadband shimmer associated with noisy preamps, inexpensive interfaces, or high-gain recordings. It can make silence feel cleaner, but too much often removes the airy part of speech and leaves a sanded-down top end.
| Setting | What It Targets | Typical Range | Over-Applied Side Effect |
|---|---|---|---|
| Noise reduction | Broadband fan, room, and environmental noise | Light to moderate reduction | Hollow or underwater speech |
| Hum removal | Electrical fundamentals and harmonics | Narrow notch and harmonic targeting | Thin voice or audible filtering |
| Hiss reduction | High-frequency broadband noise | Gentle high-frequency attenuation | Dull sibilance and lost air |
| Dereverb | Reflections from untreated rooms | Low to moderate room reduction | Metallic, phasey voice |
| Voice or stem isolation | Dialogue mixed with music and competing sources | Source-dependent separation | Warbling and damaged ambience |
Listen for interaction between controls
Pushing noise reduction high while leaving dereverb untreated can produce a voice that seems cleaner but still feels distant. The remaining reflections smear consonants, while the suppression removes the natural low-level detail that made the recording believable. Conversely, applying dereverb to a naturally dry recording can make a present voice sound unnaturally small.
Use headphones to check four things: sibilants remain intact, consonants stay crisp, metallic tones don't ring between words, and breaths don't trigger audible pumping. If the source contains music, switch to isolation before broad denoising. A dialogue stem can tolerate targeted cleanup more successfully than a full mix where the model has to guess whether a guitar overtone is noise.
Editors moving from cleaned audio into an audio-to-video workflow should preserve the processed file without unnecessary intermediate compression. The practical decision rule is straightforward: if one pass leaves competing sources, changing ambience, or obvious echo, stop increasing the same slider and move to multi-stage processing.
Matching the Workflow to Your Role and Your Audio
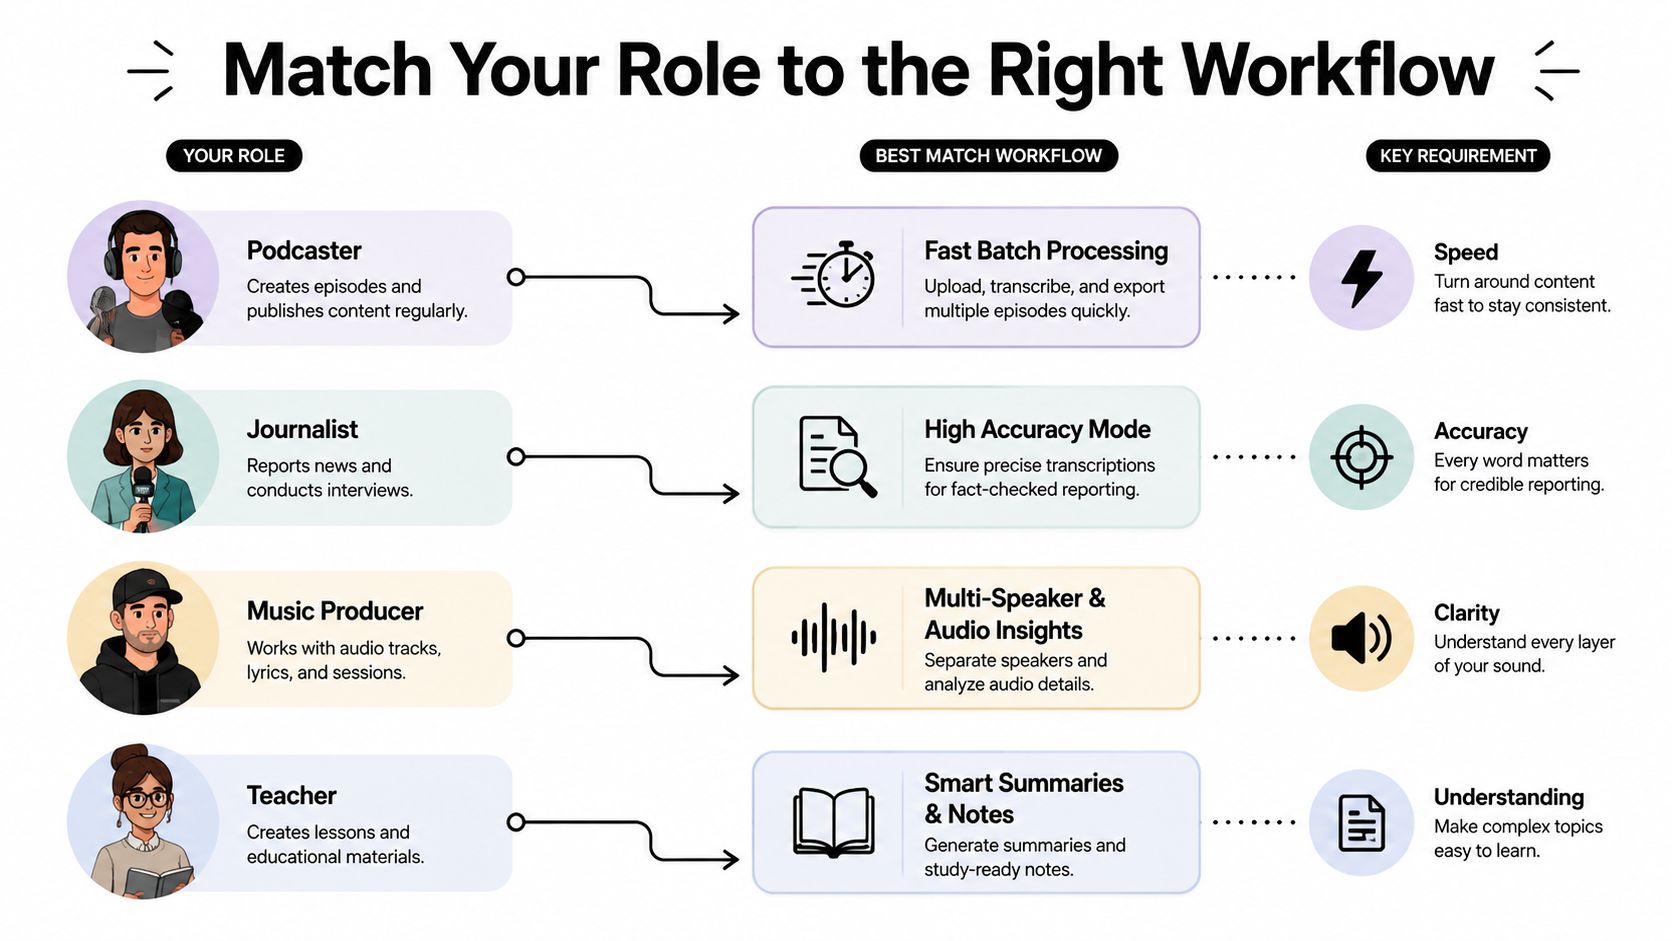
The right workflow depends less on the label “online noise remover” than on what the finished file must do. A podcaster needs intelligible, consistent speech across a conversation. A musician needs separation that respects pitch and transients. An enterprise team needs repeatable handling across a large archive.
Podcasters and journalists
For a remote two-host conversation, start with quick processing when the problem is steady room noise or call compression. A second targeted pass can handle a remaining hum or mild hiss, and each host may need separate de-essing if one voice becomes sharp after enhancement. Export a high-quality working file for the editor, then create the delivery version at the end.
The time-wasting shortcut is applying one aggressive preset to both speakers. Different microphones and rooms rarely respond the same way, so a setting that helps one host can flatten the other.
Video editors
Interview B-roll needs dialogue isolation that leaves believable room tone behind. A completely silent background can make cuts pop, especially when the visual edit changes location or camera angle. Use dereverb when the location is untreated, but keep the pass restrained enough that the voice still belongs in the scene.
For editors working with video directly, ClearAudio lets users upload audio or video, specify whether to keep speech, dialogue, vocals, or music, and choose processing modes ranging from faster processing to heavier PRO options. The shortcut that wastes the most time is cleaning the entire mixed track when isolating the dialogue first would let you repair only the source that needs attention.
Musicians and producers
A bedroom demo or sample with fan hiss may respond to light broadband reduction, but a vocal over backing tracks calls for stem separation. Process the vocal and instrument buses independently, then decide how much ambience to retain during the mix. A vocal that is technically isolated can still sound worse if every breath and room reflection has been stripped away.
The common mistake is denoising the full mix. That treats musical content as unwanted noise and can damage cymbals, sustained notes, and reverb tails.
Enterprise and education teams
Call archives, compliance recordings, lectures, and field interviews need consistency more than creative experimentation. Look for batch upload, reusable presets, transcription export, redaction support, and clear handling of sensitive files. A balanced quality mode is often more useful than a maximum setting that produces variable artifacts across microphones and environments.
The expensive shortcut is manually tuning every file without establishing a reference. Create a small test set representing the archive, approve a conservative preset, and inspect exceptions separately.
Why Over-Cleaning Breaks Audio Faster Than Noise Does
The strongest signal isn't always the cleanest result. If you push reduction until the remaining room tone falls below the point where the algorithm can model it smoothly, the voice may develop spectral holes, phasey movement, or a hollow center. Listeners may not name the defect, but they hear that the speaker no longer sounds physically present.
The quietest background isn't always the most intelligible one either. Speech depends on brief consonant attacks, breath cues, and changing vocal energy. Remove those details and you can make the waveform look tidier while making words harder to distinguish.
Three assumptions that cause bad exports
“The slider should go as far as possible.” It shouldn't. A gentle reduction that leaves a stable, unobtrusive noise floor often beats a severe pass that creates musical-noise artifacts. Research on speech enhancement specifically warns that objective SNR improvement and perceived quality can move in different directions, as described in the earlier speech-restoration evaluation.
“Silence proves the tool worked.” A dead background may sound impressive in a short sample, but it can make edits obvious and remove the acoustic context that connects phrases. For interviews and location video, preserve enough room tone to support continuity.
“One-click AI understands the recording.” It doesn't understand the editorial purpose in the human sense. The same aggressive profile that helps a street interview may damage a whispered narration, sung vowel, or presenter with strong sibilance. Models classify patterns, so you have to judge the result against the source and the intended audience.
If you can clearly hear the cleanup working, reduce the intensity and export again.
Listen for flattened prosody, chopped breaths, watery vowels, and ringing around “s,” “f,” and “t” sounds. These aren't cosmetic defects. They affect whether transcription systems, caption reviewers, and listeners can follow the speaker naturally. The goal is not the smallest possible noise floor. It is speech that remains intelligible, credible, and appropriate to its setting.
A 10-Minute Quick Start and Where Online Cleanup Is Headed Next
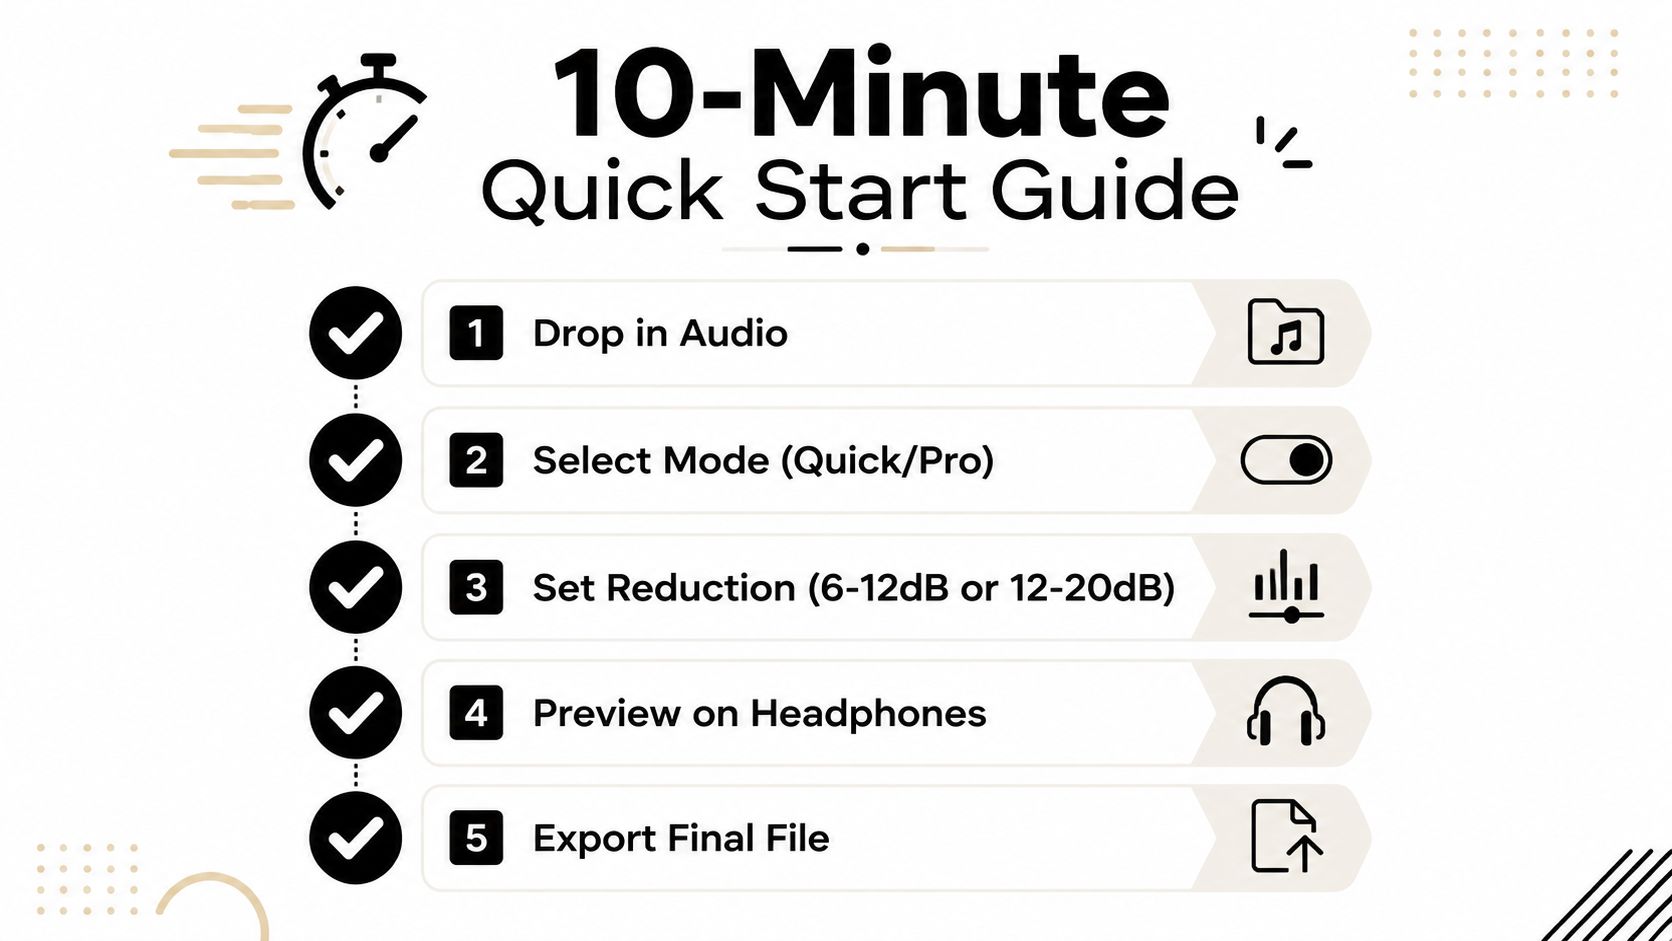
You can make a sensible first pass quickly if you avoid the temptation to solve every defect at once.
- Drop in the source: Use the cleanest WAV or high-quality file you have, and trim unnecessary silence first.
- Select the mode: Choose Quick for steady noise under straightforward speech. Choose Pro when you hear changing noise, echo, music, or competing voices.
- Set reduction carefully: For a starting point, use 6–12 dB for light noise or 12–20 dB for heavy hum, then judge the preview rather than trusting the number.
- Preview on headphones: Check sibilants, consonant attacks, breaths, room continuity, and metallic artifacts.
- Export the working file: Use 24-bit WAV for editing and 192 kbps MP3 for delivery when those formats suit the destination.
The direction of online enhancement is clear even without treating every new feature as a reason to process harder. Browser tools are moving toward adaptive profiles, real-time denoising, source separation, and more efficient models that can run with tighter memory and latency limits. Research on online enhancement also continues to address musical noise, real-time operation, and reduced memory use, as discussed in work on online non-negative matrix factorization for audio enhancement.
The foundation won't change. Identify the job, identify the failure mode, preview a restrained pass, and preserve the source until you trust the result. That sequence protects a podcast interview, a client video, a lecture, and a demo even as the algorithms underneath improve.
ClearAudio lets you upload audio or video, describe what you want to keep, and clean noise, hum, hiss, echo, or competing sources in the browser. Visit ClearAudio to test a quick voice cleanup or a deeper dialogue and stem-isolation workflow, then compare the preview before committing your recording.