You finish a vocal recording, play it back, and hear the room before you hear the performer. The words are understandable, but every pause blooms into an echo, consonants smear together, and the voice sounds several feet away. Re-recording may not be possible, especially when the track comes from a long interview, a video shoot, or a vocal stem you didn't capture yourself.
You can often remove reverb from vocals, but the right target isn't total dryness. The practical target is a voice that sounds closer, clearer, and less distracted by the room while retaining a believable tone. That means treating dereverberation as a controllable restoration process, testing small sections, and stopping before the cleanup becomes more noticeable than the original problem.
Table of Contents
- Why Vocal Reverb Is So Hard to Fix
- Quick Edits in Popular DAWs
- De-Reverb Plugins and AI Tools Compared
- Advanced Spectral Repair Workflows
- Preventative Recording Tips to Minimize Reverb
- Choosing the Right Cleanup Path for Your Project
Why Vocal Reverb Is So Hard to Fix
A boomy vocal recorded in a bare room creates a deceptively simple problem. You might try a noise gate, brighten the top end, and cut some low frequencies. Those edits can make the voice seem more present between phrases, but they don't separate the direct vocal from the reflections already printed into the recording.
Reverb differs from hum or hiss because it overlaps the wanted signal in time and frequency. A room reflection can arrive soon after the direct voice and soften the attack of a consonant. Later reflections form a tail that continues after the speaker stops. Gating can silence part of that tail between words, but it can't restore the syllables that the reflections have already masked.
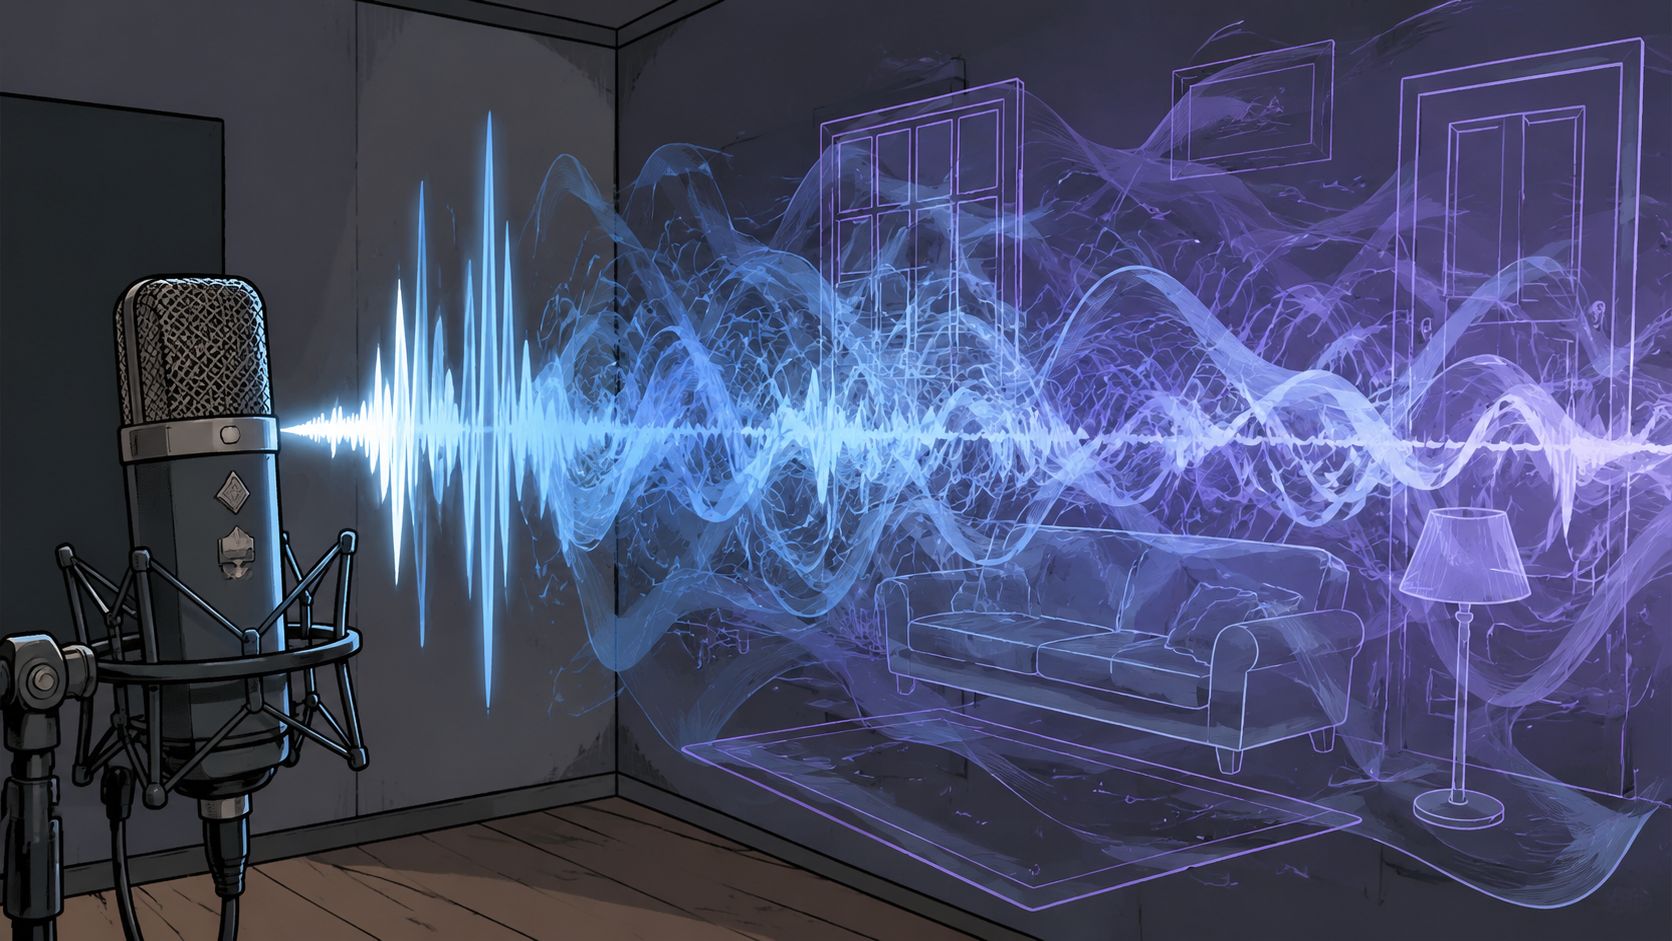
Early reflections and late reverberation
Early reflections often create a sense of room size, boxiness, or a doubled edge around the voice. Late reverberation is easier to recognize as an audible tail, especially after plosives, fricatives, and the ends of sentences. The two components interact, so a processor that reduces the tail may still leave the vocal colored by early reflections.
That distinction explains why a simple filter rarely solves the problem. Equalization changes frequency balance, while dereverberation attempts to estimate which part of the sound belongs to the direct source and which part belongs to the room. Statistical dereverberation has been a formal research topic since the early 2000s, building on much older acoustics research, including Rayleigh's work from 1877, Sabine's collected papers from 1922, and Bolt's theory from 1949. A useful historical overview is available in this research review of reverberation and dereverberation.
Practical rule: If the vocal sounds cleaner only when soloed, but becomes thin, phasey, or lispy in the mix, you've removed too much.
Why aggressive processing creates artifacts
A dereverb algorithm has to make an inference. It doesn't possess a hidden copy of the dry vocal. When the room reflections are strong, the processor may mistake parts of the voice for unwanted ambience and attenuate them. Common results include watery vowels, metallic sibilance, unstable stereo width, and a hollow tone that moves from word to word.
The severity depends on the source. A close, consistent vocal with moderate room sound gives a processor useful information. A distant microphone, changing background noise, overlapping music, and strong reflections leave less separation to exploit. Modern research increasingly treats dereverberation as a controllable tradeoff, including work on user-controlled late-reverberation reduction rather than a binary clean-or-unclean switch. The practical lesson is straightforward: choose how much room to reduce, not whether to destroy every trace of it.
Quick Edits in Popular DAWs
Start with a duplicate of the vocal and process a short, representative passage. Include a quiet pause, a phrase with hard consonants, and a sustained vowel. A setting that behaves well on one sentence can expose artifacts on breath sounds or word endings.
The fastest manual chain usually combines level control, modest equalization, and careful gating. These tools won't reconstruct a dry recording, but they can reduce the cues that make a reverberant vocal feel distant.
A practical manual chain
Trim the excess low end. Use a high-pass filter to reduce rumble and some room buildup, then make a narrow cut only where the vocal sounds swollen or boxy. Sweep gently instead of guessing, because the offending band varies with the voice and room.
Use a gate as a pause editor. Set the threshold so it closes during genuine silence but stays open through quiet syllables and breaths. A slower release usually sounds less abrupt than a fast close, while too much reduction makes every pause snap unnaturally.
Control harshness after cleanup. Dereverberation and high-frequency boosts can exaggerate sibilance. A de-esser or restrained high-shelf adjustment is safer than continually adding brightness to force presence.
Shape transients with restraint. If the vocal attack is smeared, a transient tool can make consonants feel more defined. Reducing or emphasizing attack too strongly can make speech aggressive, brittle, or processed, so compare the edited version at the same loudness as the original.
Automate problem phrases. A static plugin setting often overprocesses clean lines to fix one bad phrase. Clip gain, short automation moves, or region-based processing can keep the rest of the performance intact.
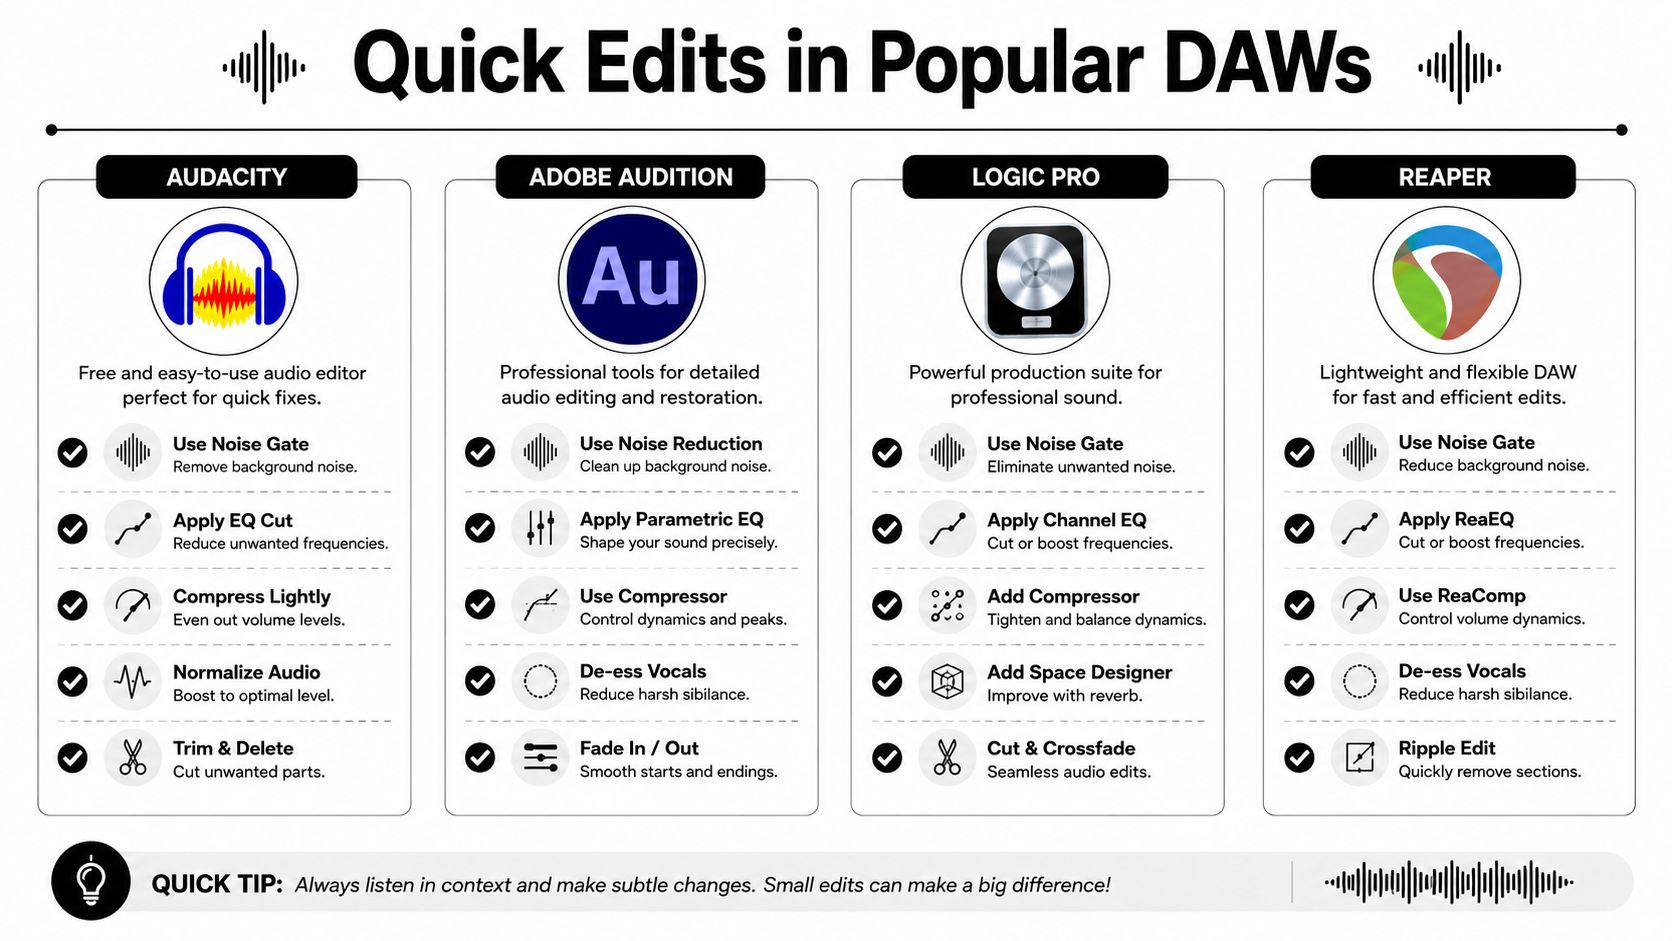
Audacity can handle the basic version of this approach with its equalization, noise gate, compression, and spectral editing tools. Adobe Audition offers a convenient waveform and spectral workflow for isolating troublesome moments. Logic Pro users can combine channel EQ, dynamics, automation, and Apple's built-in voice isolation options. Reaper gives you flexible routing, item-based processing, and easy A/B comparisons without forcing one fixed chain.
Check the result in context
Don't judge only with headphones in solo. Listen to the vocal over the music or room tone, then reduce the effect until the voice sits naturally. A little residual ambience can help a performance belong to its scene, while a completely dry vocal may sound pasted on top.
For broader DAW selection and podcast editing workflows, Contesimal's podcast software picks can help you compare the surrounding tools rather than choosing a dereverb feature in isolation.
The following video provides a visual walkthrough of common vocal cleanup ideas:
If the recording contains obvious room echo throughout the entire phrase, manual edits may improve the presentation without removing the reverb. At that point, a dedicated processor is usually more efficient than stacking corrective EQ and gating.
De-Reverb Plugins and AI Tools Compared
Dedicated plugins and browser-based AI tools approach the same problem from different directions. A traditional plugin generally gives you more direct control over reduction, frequency behavior, timing, and artifacts. An AI system can be faster when the recording is messy, the source is a single file, or you don't want to build a restoration chain from scratch.
For spoken dialogue, speed and intelligibility usually matter most. For a sung vocal stem, preserving pitch character, breath detail, vibrato, and stereo behavior becomes more important. Field recordings add another complication because traffic, wind, handling noise, and changing acoustics can confuse any processor.
Choose by source, not by brand name
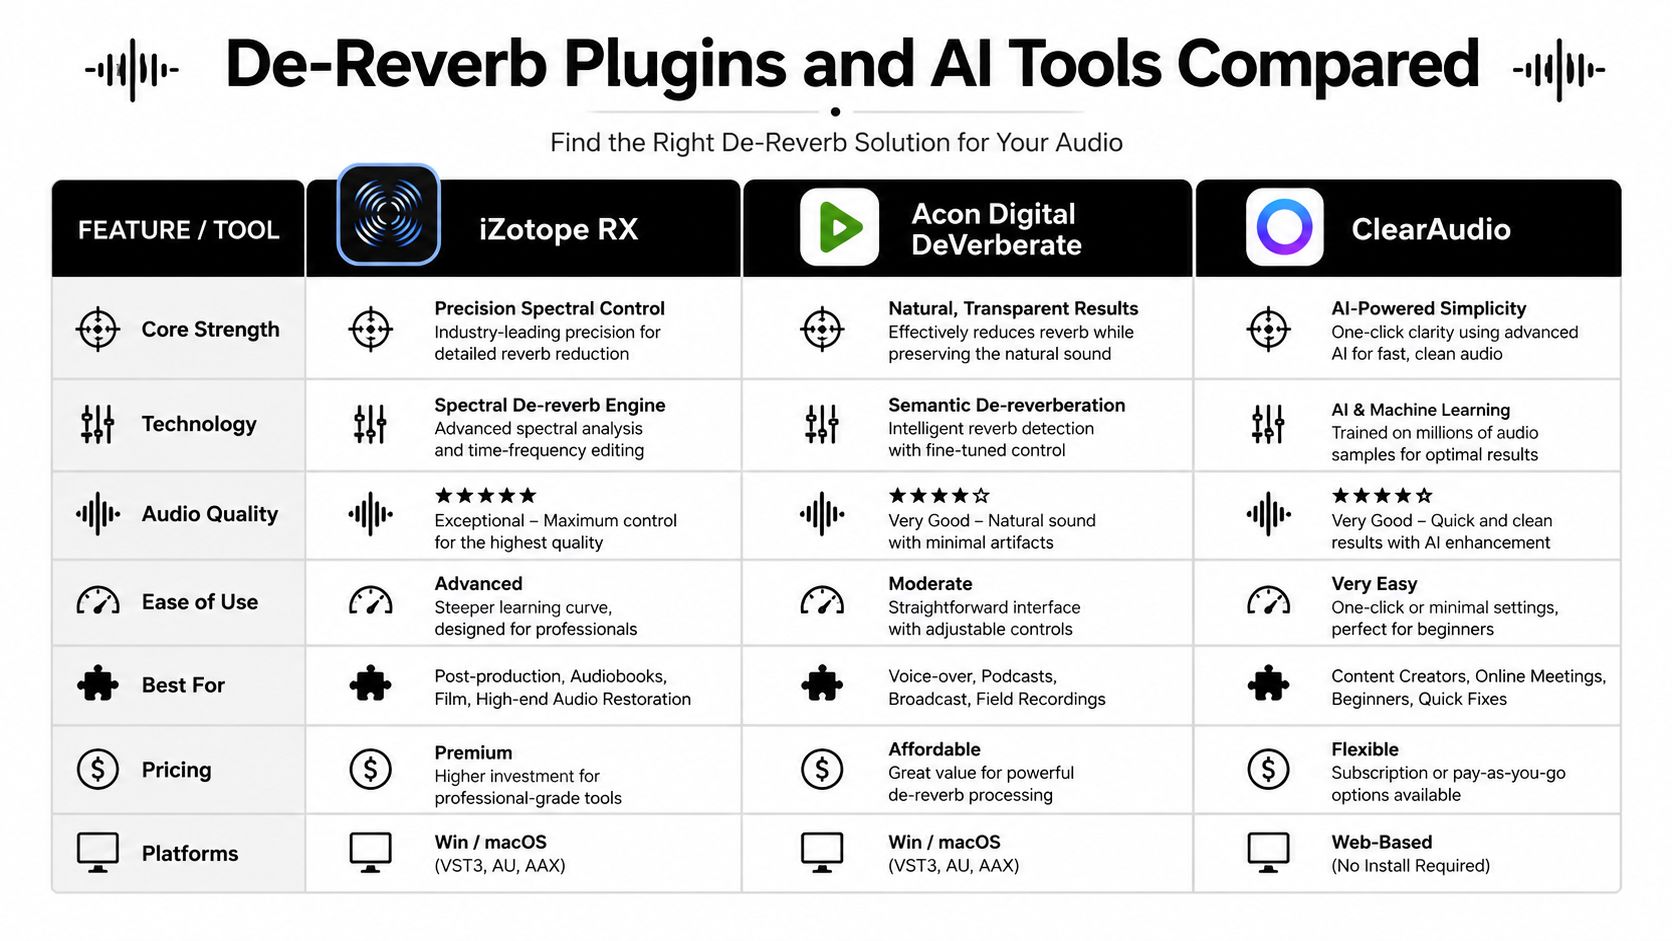
iZotope RX is a strong fit when you need detailed spectral inspection and repair. It makes sense for editors who want to see where the tail sits and treat individual events rather than applying one broad setting.
Acon Digital DeVerberate is suited to users who want a dedicated dereverb processor with more traditional parameter control. It can fit naturally into a DAW-based vocal chain where you want to automate intensity or compare different processing stages.
ClearAudio takes a browser-based, prompt-oriented approach. You can upload audio or video, specify what you want to preserve, including vocals or dialogue, and target unwanted room echo alongside other cleanup needs. That workflow is useful when you have a single vocal file and need a practical starting point without configuring a complex restoration session.
What works and what doesn't
A plugin tends to work best when the editor can listen closely, adjust a specific problem, and preserve the character of a valuable performance. It doesn't remove the need for judgment. If the direct vocal and the reflections share too much information, pushing the reduction further usually trades room sound for coloration.
AI tools are particularly useful for unpaired material, where no clean reference exists. Recent work on weakly supervised speech dereverberation examines systems trained with limited acoustic information such as RT60 rather than ideal paired clean and reverberant recordings, while a vocal-focused diffusion approach reports unsupervised music dereverberation without paired training data. See the weakly supervised dereverberation research for context on why single-file restoration remains an active problem.
The strongest choice depends on the deliverable:
- Podcast dialogue: Start with the fastest tool that preserves consonants and speaker identity. Inspect breaths and pauses before processing the full episode.
- Music vocals: Compare the cleaned stem against the backing track. A vocal that sounds impressive solo may lose its emotional connection when stripped of all room character.
- Field recordings: Treat dereverb as one part of restoration. Separating voice from background sound may matter more than making the room completely dry.
- Time-sensitive video: A browser workflow can be practical when you need a quick test before committing to detailed spectral work.
A benchmark can help, but it won't replace listening. MVSEP's public reverb-removal benchmark evaluates 27 validation tracks and reports SDR values including 8.80, 6.67, and 6.18 for different systems on the same validation set, as documented on its vocal reverb-removal benchmark page. Those scores show that dereverberation is measurable and that models differ, but they don't tell you whether a particular singer's tone still feels believable.
Advanced Spectral Repair Workflows
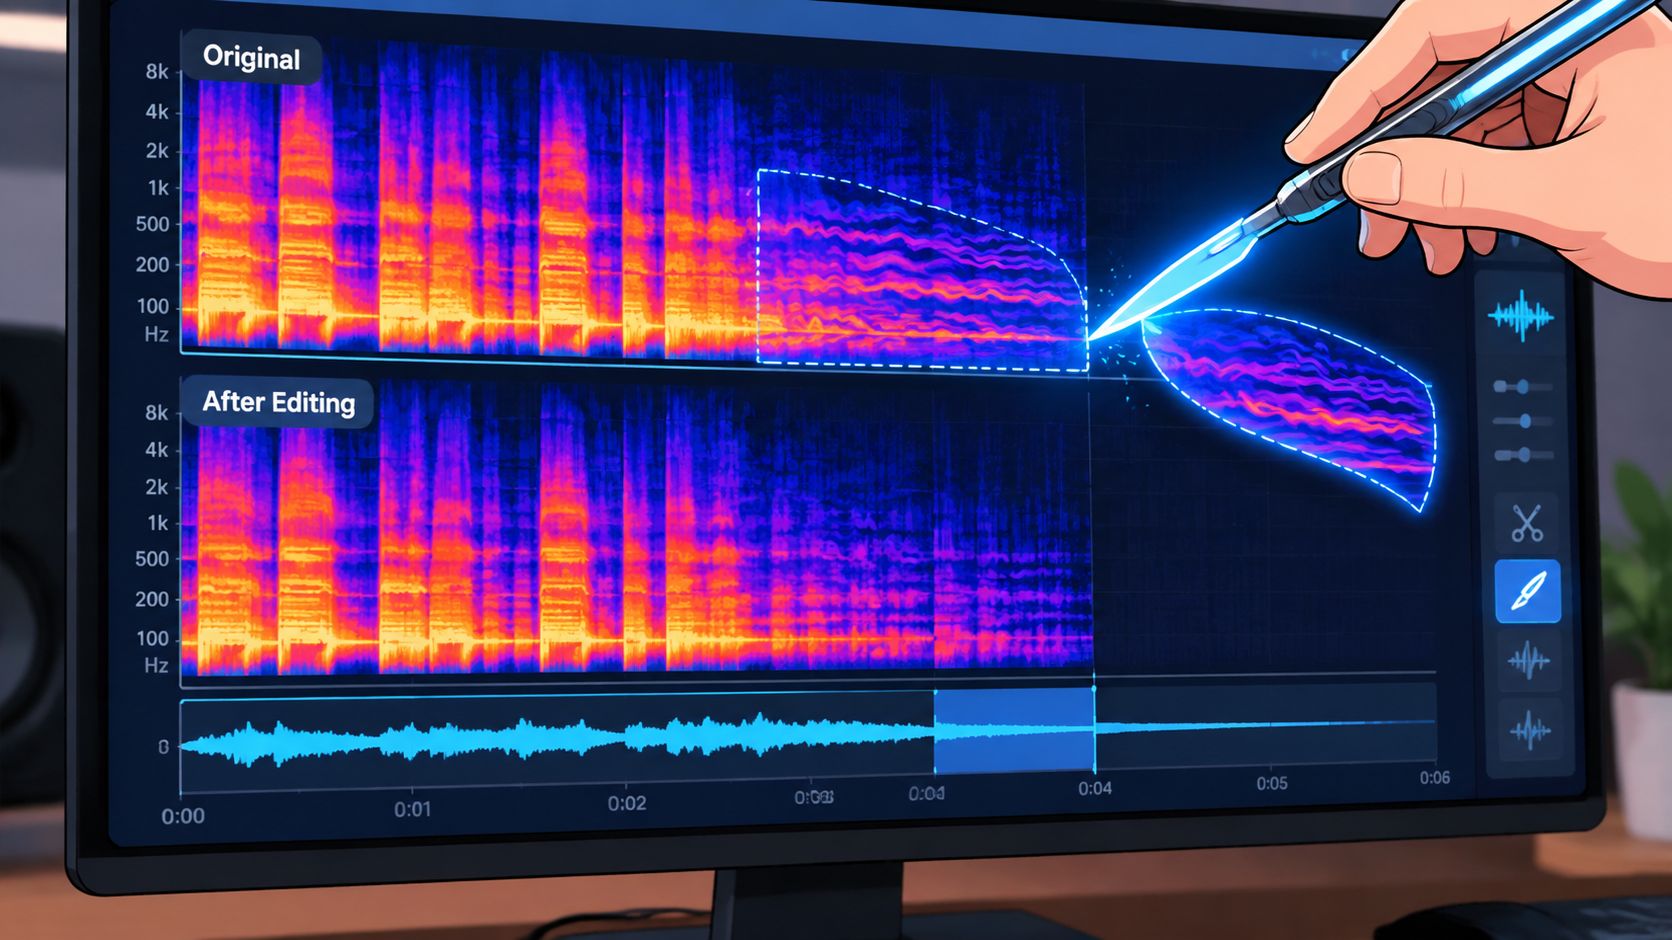
Spectral repair becomes valuable when the reverb is localized, intermittent, or tied to particular frequency regions. Instead of asking a processor to treat the entire vocal uniformly, you can inspect the waveform and spectrogram, identify the worst tails, and attenuate only what the ear identifies as distracting.
This approach takes longer, but it protects clean phrases. A vocal may have a few exaggerated reflections after loud words while the rest of the performance is usable. Processing those moments independently often sounds more natural than applying heavy dereverb to the whole file.
Use staged processing
Separate denoising and dereverberation when the recording contains both problems. Noise reduction can alter the material that a dereverb processor uses to recognize the voice, while dereverberation can expose low-level noise that was previously masked. Two restrained passes are often easier to diagnose than one aggressive, all-purpose setting.
A sensible advanced sequence looks like this:
- Create a reference segment. Keep the unprocessed clip available and match playback levels before comparing.
- Reduce steady noise conservatively. Avoid stripping breaths or consonant texture.
- Apply dereverb with a moderate target. Focus first on the tail and distance impression.
- Use spectral repair on isolated failures. Smooth harsh residues around specific phrases instead of flattening the complete recording.
- Restore tonal balance. Recheck low-mid weight, sibilance, and vocal presence after every major pass.
- Review in context. The mix determines whether the remaining room is a flaw or useful depth.
A technically cleaner vocal can be the wrong vocal if the performer loses warmth, breath, or connection.
Measure without worshipping the metric
Objective evaluation can reveal changes that casual listening misses. Dereverberation workflows commonly consider PESQ, STOI, SRMR, and reverberation-tail measures, but these metrics describe different aspects of quality. Clarity, intelligibility, coloration, and naturalness don't always improve together.
A recent real-time speech enhancement study reported a two-step approach with ΔFWSegSNR of 2.302, ΔPESQ of 1.307, and a real-time factor of 0.083, as described in the study's dereverberation evaluation. The important practical point isn't that one sequence guarantees a result. It's that staged processing can outperform simultaneous enhancement in some conditions, while metric scores may disagree about which output sounds best.
For a professional pass, use measurement as a warning system, not a final judge. If intelligibility improves but the voice becomes metallic, stop and back off. If the tail remains audible but the speaker sounds human and the words land clearly, the remaining ambience may be the better choice.
Preventative Recording Tips to Minimize Reverb
The cheapest reverb removal happens before the microphone captures the room. A better position, a softer nearby surface, and a quieter recording angle can preserve vocal detail that no restoration tool can reliably recreate later.
You don't need expensive equipment to improve the result. A costly microphone placed far from a reflective wall can produce a more difficult recording than a modest microphone positioned close to the speaker in a controlled corner.
Make the room work for you
Start by listening for the room's strongest reflections. A clap test can reveal a sharp slap or flutter, although it won't replace careful monitoring. Record a short spoken sample from the exact microphone position, then move the setup and compare the decay of pauses and consonants.
Useful changes include:
- Move away from large reflective surfaces. Glass, bare walls, ceilings, and hard floors return energy to the microphone.
- Add absorption near the voice. Thick furnishings, curtains, rugs, and purpose-built panels can reduce the energy available for reflections.
- Keep the microphone close enough for a healthy direct signal. The closer the wanted voice is relative to the room, the less room sound dominates the recording.
- Aim the microphone deliberately. A tighter polar pattern can reject some off-axis reflections, but only if the microphone's rear and side rejection point toward the problematic surfaces.
- Monitor with headphones before recording. Catching printed reverb early is far cheaper than repairing a full session.
Portable isolation shields can help in some setups, but they don't magically make a reflective room disappear. They work best as part of a broader arrangement that controls the microphone's position and the nearby surfaces.
Treat prevention as part of the budget
A basic home setup can be improved gradually. Spend first on placement and room control, then judge whether a new microphone solves a remaining weakness. For practical ideas on building a recording studio for any budget, look for guidance that treats acoustic control, workflow, and equipment as connected decisions.
The recording itself should also match the final use. A vocal intended for intimate narration may need less room than a sung performance meant to sit inside a larger production. Leave yourself a clean, dry option whenever possible, and add reverb later so the balance remains controllable.
Choosing the Right Cleanup Path for Your Project
Your source material determines the sensible workflow. A lightly reverberant close vocal may need only EQ, automation, and a restrained dereverb pass. A distant interview recorded in a reflective room may justify an AI cleanup test, followed by manual repair of the phrases that develop artifacts.
Use this decision process:
- For a podcast or interview, prioritize intelligibility and speaker identity. Process a representative excerpt, check pauses and sibilants, then apply the chosen settings conservatively.
- For a music vocal stem, compare solo and in the full arrangement. Preserve emotional space if removing the room makes the singer feel disconnected.
- For a field recording or video, isolate the dialogue first if competing sounds are masking it. Dereverb alone won't solve overlapping voices or unstable background noise.
- For a high-value restoration, use spectral editing and staged passes. Keep every intermediate version so you can retreat when a later process damages the tone.
A short test prevents long regrets. Match loudness between the original and processed clips, listen on headphones and speakers, and ask whether the vocal sounds closer without sounding synthetic. If the remaining room is less distracting than the artifacts introduced by further reduction, stop there.
For creators who want a broader workflow around dialogue cleanup, this step-by-step audio editing guide can help organize editing decisions beyond dereverberation. The best result isn't the driest file. It's the version that communicates clearly, fits its context, and still sounds like the person who performed it.
ClearAudio lets you upload audio or video, choose what to preserve, including vocals or dialogue, and target room echo as part of a browser-based cleanup workflow. Try your most problematic vocal on ClearAudio, compare the processed excerpt with the original, and keep the setting that improves clarity without erasing the voice's natural character.