You press record, the guest starts speaking, and a low drone appears underneath every word. It may have arrived when you connected a laptop charger, moved a microphone beside a power adapter, or plugged a monitor into the same setup. Because the sound is steady, creators often blame the microphone or recorder first, but audio hum usually points to a connection, power path, cable, or nearby electrical field.
The useful question isn't “how do I remove hum?” It's what causes audio hum in this particular signal chain? Once you identify whether the noise is a ground loop, electromagnetic pickup, a cable fault, power-supply ripple, or digital contamination, the correct fix becomes much easier to choose.
Table of Contents
- Why Your Recording Suddenly Has That Annoying Hum
- The 50 and 60 Hz Fingerprint Every Listener Can Hear
- The Five Main Categories of Audio Hum
- A Step-by-Step Isolation Checklist to Find the Source
- Practical Fixes for Each Hum Type
- Why Modern Digital Gear Creates New Hum Problems
- Prevention Habits and When Software Cleanup Saves the Day
Why Your Recording Suddenly Has That Annoying Hum
A podcaster is halfway through a remote interview when the headphones reveal a deep, constant tone. The microphone was quiet during setup, but the hum appeared as soon as the laptop was connected to an audio interface and an external display. Swapping the microphone doesn't help. Lowering the preamp gain makes the voice too quiet, while the drone remains.
That pattern tells you something important. Hum rarely appears at random. It usually enters at a particular point in the chain, such as the connection between a computer and interface, a cable running alongside mains wiring, or a power adapter feeding unwanted interference into an analog stage.

Start with the sound, not the suspected device
Hum has a recognizable character. A smooth low drone suggests mains-frequency contamination. A sharper buzz may contain several harmonics. Crackling or intermittent noise points more toward a damaged connector, bad solder joint, or unstable contact than a simple ground loop.
The timing also matters. If the noise begins when you connect a charger, inspect the charger and the new ground path. If it changes when you move a cable near a transformer or dimmer, suspect induction. If it appears only when a USB device, HDMI cable, or dock is connected, investigate the digital equipment before replacing the microphone.
Practical rule: Don't replace parts until you know what changed when the hum appeared.
You can treat the setup like a detective scene. Keep the microphone and recorder fixed, then remove or reconnect one link at a time. Grounding, shielding, cable construction, power delivery, and computer interfaces each leave different clues, so the goal is to match the symptom to its pathway rather than randomly swap cables.
The 50 and 60 Hz Fingerprint Every Listener Can Hear
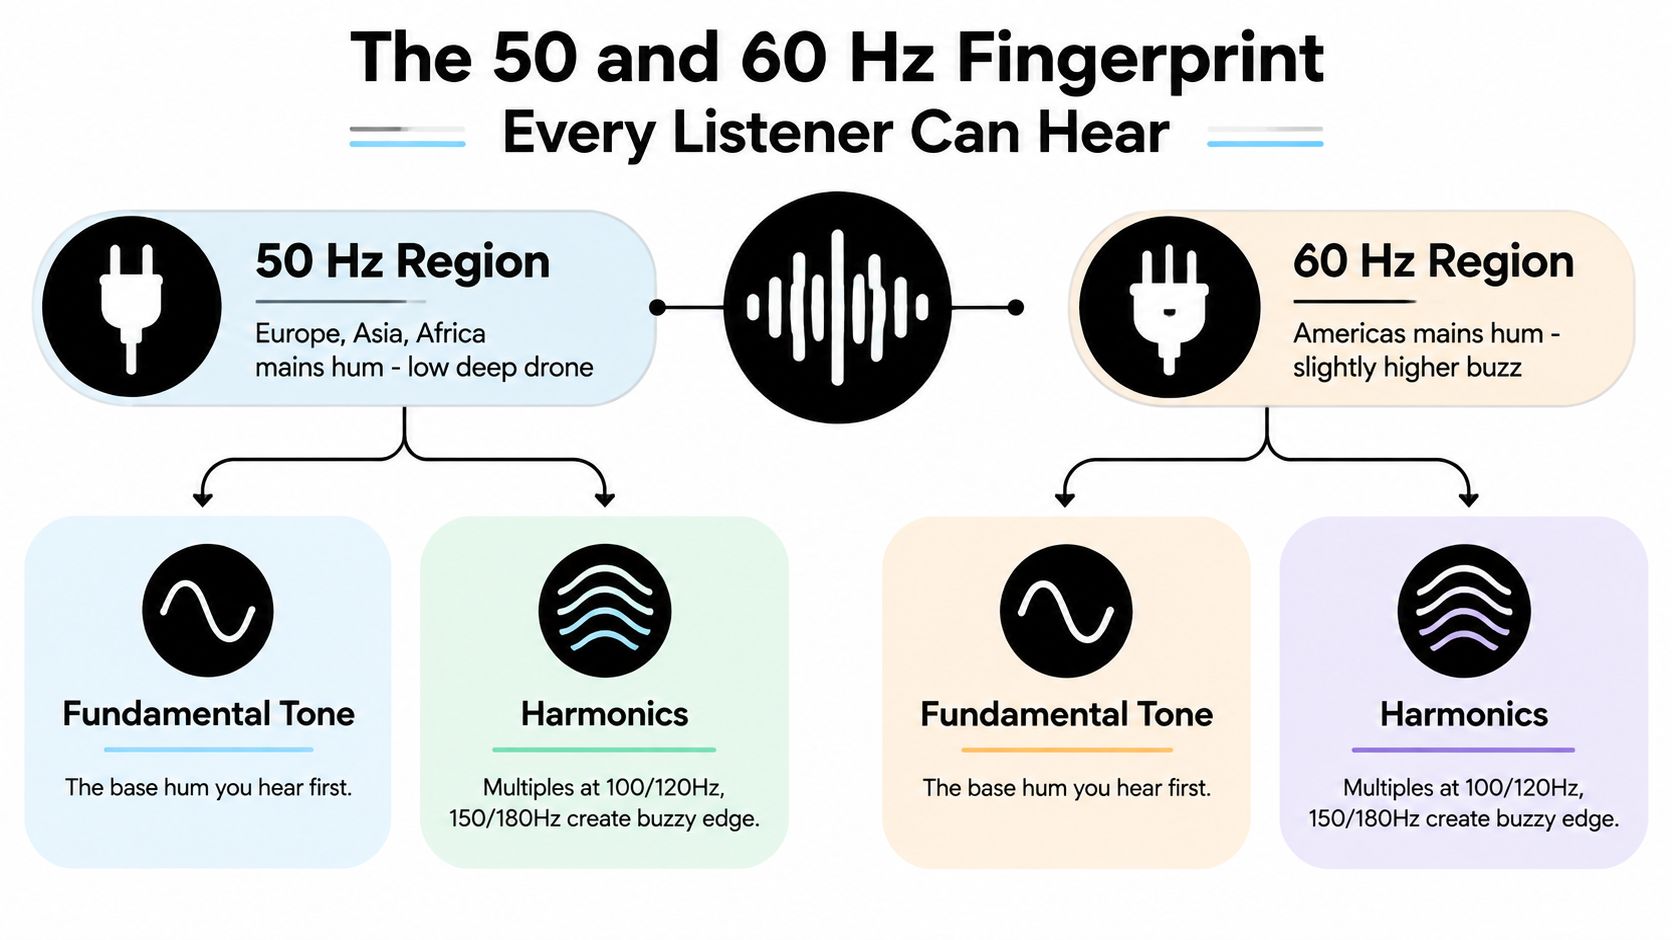
The first diagnostic clue is frequency. Electrical grids run at 50 Hz in most of the world, while North America and parts of Asia use 60 Hz, so power-related hum commonly appears at the local mains frequency. Its second harmonic often appears at 100 Hz or 120 Hz, creating a deeper or buzzier tone depending on the equipment and the path the interference takes. The relationship between electrical systems and unwanted audio tones is also outlined in this resource on frequency interference history.
Think of the fundamental as the first note from a vibrating string. Harmonics are additional notes layered above it. A clean 50 or 60 Hz tone can sound like a smooth drone, while strong harmonics make the sound rougher, closer to a buzz.
How to use the fingerprint
Listen first, then verify with a spectrum analyzer in a tool such as Audacity. A narrow peak around the local mains frequency suggests power-line coupling, a grounding fault, or a ground-loop path. A strong peak around 100 or 120 Hz more often suggests rectified power-supply ripple or a coupling path shaped by an unbalanced connection.
The frequency doesn't prove the cause by itself. A ground loop can produce the fundamental and harmonics, and electromagnetic interference can enter through several routes. Treat the spectrum as a direction sign, not a final verdict.
A practical listening test is to compare the noise with a known recording or a silent input. If the tone remains at the same pitch while you move the microphone, the interference may be entering later in the chain. If its level changes as you move the microphone or cable near a power transformer, the pickup is probably happening earlier.
This shortcut matters because it separates hum from other problems. Microphone self-noise tends to resemble hiss, while clipping produces harsh distortion around loud program material. A stable 50, 60, 100, or 120 Hz pattern belongs to a different diagnostic family.
The Five Main Categories of Audio Hum
Most cases fit into a small group of failure modes. The categories can overlap, but each one has a useful starting clue.
Ground loops
A ground loop forms when connected equipment has more than one path to earth ground. Small voltage differences between grounded devices can drive unwanted current through cable shields or interconnects, turning those shields into a route for low-frequency interference. This often happens when a laptop, interface, mixer, monitor, and camera are powered from different outlets.
The familiar symptom is a steady mains-related tone, often with harmonics. Before changing a protective-earth connection, understand the safety implications. A plain-language explanation of why earthing matters for safety can help distinguish safe audio isolation from unsafe removal of protective grounding.
Electromagnetic interference
EMI enters without necessarily using the ground-reference network. A cable may act like a receiving loop beside a transformer, dimmer, motor, LED driver, or power brick. Unbalanced cables and poorly shielded instrument leads are especially exposed because the signal and return path don't reject interference as effectively as a balanced connection.
If moving the cable changes the hum level, induction becomes more likely. The same clue applies when the noise rises near a lighting control, power adapter, or large transformer.
Faulty or low-quality cables
A broken shield, cold solder joint, damaged connector, or missing ground connection can create hum, crackle, or intermittent noise. A cable may work when held still and fail when flexed, which separates it from a stable ground-loop symptom.
Test suspect cables one at a time. If the noise follows the cable when you move it to another channel or replace it with a known-good lead, the cable deserves attention before the rest of the system.
DC-related input faults
A small unwanted bias at a preamp input can upset an input stage and produce low-frequency contamination or a buzz-like symptom. This problem usually requires measurement or service rather than casual rewiring. Don't insert components into a powered signal path unless you know the circuit and the required voltage ratings.
USB and digital contamination
Computers, USB-connected interfaces, switching supplies, docks, and mixed consumer and professional gear can create hum-like noise. Current may travel along a cable shield or shared reference, while digital circuitry can add sharper hash around the low-frequency tone. The problem may appear only when a charger, display, USB hub, or HDMI device is connected.
| Hum Category | Typical Frequency Signature | Common Source | Example Setup |
|---|---|---|---|
| Ground loop | Mains tone with possible harmonics | Multiple ground paths | Laptop charger, interface, and monitor connected together |
| Electromagnetic interference | Mains tone, buzz, or changing level | Induced field from power equipment | Unbalanced cable beside a transformer |
| Faulty cable | Hum with crackle or intermittence | Broken shield or connector | Instrument lead that reacts when flexed |
| DC-related input fault | Low-frequency buzz or unstable contamination | Bias or input-stage problem | Preamp with a service-related input issue |
| USB or digital contamination | Hum, buzz, or high-frequency hash | Computer, dock, charger, or USB path | Interface becomes noisy only when a laptop charger is connected |
A Step-by-Step Isolation Checklist to Find the Source
Isolation works best when every test has one variable. Start with the smallest possible system and add components back in sequence.
Listen to playback alone. Disconnect microphones, instruments, computers, and external sources from the interface. Monitor the interface with headphones. If the hum remains, the interface, its power supply, or the headphones are involved. If it disappears, the fault is farther upstream or in an attached device.
Mute and swap one path. Mute channels, then reconnect one input at a time. Replace each XLR, TRS, or TS cable with a known-good lead. A sudden drop in hum after one replacement identifies the removed link as the main suspect.
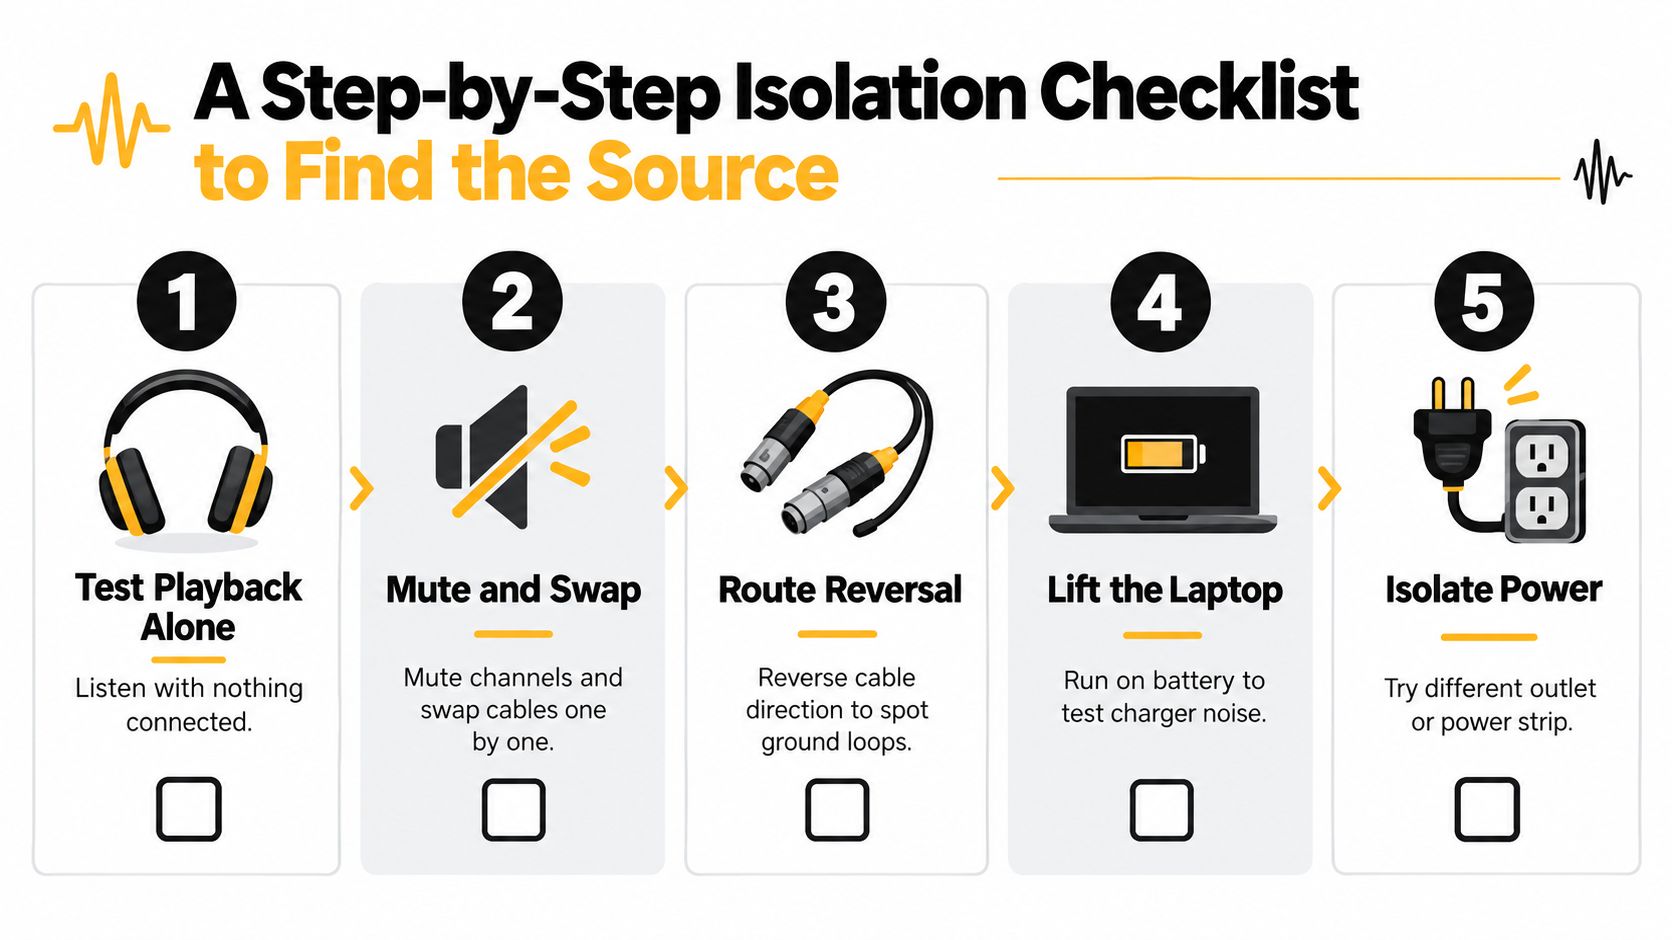
Reverse the route where appropriate. Change the cable path and separate audio leads from power conductors. Move an unbalanced cable away from chargers, monitors, lighting controls, and transformers. If the level changes with routing, you're testing an induction path rather than a hidden recorder fault.
Run the laptop on battery. Disconnect the charger while keeping the audio connection in place. If the hum falls sharply, the charger or the laptop's connection to the rest of the system is introducing a reference or power problem. Don't defeat protective grounding with improvised adapters.
Isolate power carefully. Try a different outlet or a single quality power strip for the connected equipment, then reconnect devices individually. A change in level is useful evidence, not proof that every device must permanently share one outlet.
If the problem is in household wiring, stop experimenting and ask a qualified electrician. General electrical fault-finding guidance, such as this resource on Dublin homeowner electrical troubleshooting, is not a substitute for safe work on mains circuits.
Use the test results to choose the repair family. A charger-dependent hum points toward digital or ground-reference contamination. A cable-dependent problem points toward shielding or connectors. A movement-dependent problem points toward EMI, while a noise floor that remains with nothing connected points toward the interface or its power supply.
Practical Fixes for Each Hum Type
The correct fix depends on how the unwanted current or field reaches the audio path. A ground-loop remedy won't solve a cable with a broken shield, and ferrite material won't repair a loose connector.
| Hum Type | Best Fix | Why It Works |
|---|---|---|
| Ground loop | Isolation transformer, suitable DI box, or correctly designed ground isolation | Interrupts the unwanted audio-current path while preserving safe protective grounding |
| EMI pickup | Balanced cabling, shorter unbalanced runs, and better cable routing | Reduces the cable's exposure and improves rejection of external fields |
| Cable fault | Continuity testing, connector repair, or cable replacement | Restores the intended signal and shield paths |
| DC-related input issue | Professional service or circuit-appropriate blocking and filtering | Prevents unwanted bias from disturbing the input stage |
| USB or digital contamination | Isolate the offending device, change the interface path, or improve power separation | Removes the digital equipment or reference path injecting the noise |
Ground loops need isolation, not unsafe disconnection
An audio isolation transformer or DI box with an appropriate ground-lift function can break the unwanted signal connection while leaving protective earth intact. Star-oriented power distribution can also reduce unintended reference paths, but it won't fix every system because equipment may still connect through USB, HDMI, network cables, or rack hardware.
Never remove the earth pin from a mains plug as a casual hum cure. The safety ground protects people from faults. Audio isolation belongs in the signal path or in equipment designed for that purpose.
EMI needs distance and symmetry
Use balanced XLR or TRS connections wherever the equipment supports them. Keep unbalanced TS, RCA, and 3.5 mm runs short, route them away from power conductors, and move them away from dimmers, transformers, motors, and power bricks. Ferrite chokes can help with some high-frequency interference, but they aren't a universal cure for a 50 or 60 Hz ground current.
Cable and input faults require testing
A multimeter continuity check can expose a broken shield or intermittent conductor, provided the cable is disconnected from all equipment. A damaged connector may need resoldering, while a persistent input-stage problem belongs with a qualified technician. Don't add a blocking capacitor based only on the word “hum,” because the wrong value, polarity, or placement can create distortion or damage.
Why Modern Digital Gear Creates New Hum Problems
A modern recording chain may contain a laptop, USB interface, charger, monitor, HDMI adapter, dock, camera, and powered speakers. Each device can introduce another electrical reference or switching supply into a system that previously had only a microphone, mixer, and recorder.
Switching power supplies and computer circuitry can place high-frequency energy on power and signal references. An analog input may then reproduce part of that contamination as audible buzz, whine, or low-frequency modulation. The cable doesn't need to be defective. It may be carrying an unwanted current on its shield or return path.
Clues that point toward a computer
Watch for changes tied to a specific digital action:
- Charger state: The hum appears when the laptop charger is connected and falls when the computer runs from its battery.
- USB port: One port or hub creates noise while another connection stays quiet.
- Display connection: HDMI, a dock, or a monitor adds a ground-reference path.
- Cable type: A short balanced connection stays clean while a 3.5 mm or RCA path becomes noisy.
- Computer activity: The character changes with device activity, screen brightness, or power-management behavior.
These clues don't mean USB is inherently noisy. They mean the digital device has become part of the analog reference network, or its power system is coupling into the audio path.
Targeted remedies include a better-isolated interface, a balanced output, a carefully shielded USB cable, or a different connection architecture. Optical digital links can separate electrical grounds where the equipment supports them. A dedicated power supply may also help, but only when it matches the device's specifications. Test the system after each change so you know which intervention solved the path.
Prevention Habits and When Software Cleanup Saves the Day
The cheapest hum fix is a setup that doesn't create unnecessary paths. Label power and audio cables, keep signal leads away from power runs, inspect connectors during routine setup, and replace questionable cables before an important interview. Use balanced wiring as the default for longer or professional connections, then reserve unbalanced leads for short, controlled runs.
A simple working routine keeps the diagnosis visible:
- Map the chain: Write down every connection between microphone, interface, computer, monitor, camera, and speakers.
- Separate routes: Keep audio and mains wiring apart where the room allows.
- Check connectors: Look for loose shells, bent contacts, damaged strain relief, and intermittent movement.
- Control additions: Add USB hubs, displays, chargers, and adapters one at a time.
- Preserve safety: Use proper surge protection and never defeat protective earth as an audio shortcut.
Software is useful after the physical cause has been controlled. A notch filter can reduce a known mains tone, while a spectral editor such as iZotope RX can target hum and harmonics without removing the entire voice. The processing should be conservative, especially on speech, because aggressive filtering can thin voices or leave unnatural gaps around sustained sounds.
Use cleanup as restoration, not permission to ignore a dangerous or repeatable wiring fault.
A recurring tone at the same frequency in every session is a hardware or setup issue until proven otherwise. Remove it at the source when possible, then use noise reduction for the remaining contamination in a recording that can't be recreated.
Keep this short checklist near the rig: identify the frequency, test headphones with nothing connected, add one device at a time, run the laptop on battery, swap cables, move audio away from power, and isolate a confirmed signal path with appropriate equipment. For recordings that still need repair, ClearAudio can process uploaded audio or video to reduce hum, hiss, noise, and room echo while keeping the selected speech or other desired material intact.
If a recording still contains a steady hum after you've isolated the likely source, upload it to ClearAudio for targeted cleanup and dialogue enhancement. Use the result as a practical final stage for interviews, podcasts, field recordings, and video edits, while keeping the underlying wiring fix in place for future sessions.